Usługa do tworzenia zabezpieczonych archiwów
OS X nie pozwala na proste tworzenie archiwów zip, zabezpieczonych hasłem. Możliwe jest to dopiero za pośrednictwem Terminala. Dzięki Automatorowi można jednak utworzyć usługę, która błyskawicznie utworzy taki plik.
Zaczynamy od uruchomienia Automatora, a następnie wybrania utworzenia nowej usługi. Następnie do głównego pola programu przeciągamy usługę Uruchom AppleScript i w jej polu wpisujemy poniższy kod:
on run {input, parameters}
	set dialogResults to display dialog "Wprowadź nazwę archiwum (bez rozszerzenia)" default answer "Archiwum" buttons {"OK", "Anuluj"} default button "OK"
	if button returned of dialogResults is "OK" then
		set passwd to text returned of (display dialog "Podaj hasło dla utworzonego archiwum" default answer "Haslo" buttons {"OK", "Anuluj"} default button "OK")

		set archiveName to text returned of dialogResults

		tell application "Finder"
			set archiveFileName to archiveName & ".zip"
			-- Append on a number if file exists.
			set suffix to 1
			set theFileExists to true
			repeat while theFileExists
				try
					set archiveFile to ((container of (item 1 of input) as Unicode text) & archiveFileName)
					if exists file archiveFile then
						set archiveFileName to archiveName & suffix & ".zip"
						set suffix to suffix + 1
					else
						set theFileExists to false
					end if
				end try
			end repeat
		end tell
		set itemStr to ""
		repeat with thisItem in input
			set itemPath to quoted form of (POSIX path of thisItem)
			tell application "Finder"
				set parentFolder to POSIX path of (container of thisItem as alias)
			end tell
			set itemStr to itemStr & " " & itemPath
		end repeat
		set zipFile to quoted form of (parentFolder & archiveFileName)
		set cmd to "zip -P " & passwd & " -rj " & zipFile & " " & itemStr & " -x *.DS_Store"
		do shell script cmd
	end if
	return
end run
Teraz uzupełniamy górną sekcję według poniższego wzoru:
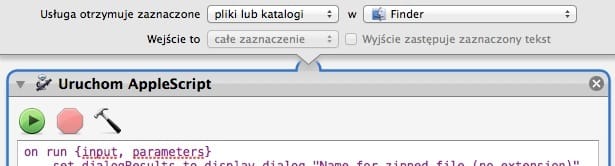
Zapisujemy usługę, a następnie sprawdzamy jej działanie. Po zaznaczeniu w Finderze jednego lub kilku plików i katalogów wybieramy ją z menu kontekstowego. Zostaniemy poproszeni o podanie nazwy archiwum, a następnie o wprowadzenie hasła. Jeżeli wszystko działa prawidłowo, to po otwarciu utworzonego archiwum zostaniemy poproszeni o wpisanie hasła.
Źródło: Macworld
Komentarze: 1
Tego mi brakowało w OS X.